More frequently in the entertainment world I come across with the so called “button-pushers” (so to nicely speak, as I can consider myself one) who cheer for that or the other team, oops… console. Now, talking about Lighting Programming, for the last time, the best console ever is the one you know better! I have seen wonderful shows, simple but impressive, realised with a mid/low market console of the ’90s in the hands of an operator with a sharp and sensitive touch, and I have seen awful shows set up with a super full state-of-the-art console, with even more full back up, handled by an operator moving his fingers on the faders like a farmer who’s late in sowing of the last corner of his field.
Watch out, in this series of articles I won’t name any specific brand or model, but in the end you’ll be able to set up the ABC of programming on whatever console. Moreover, always in the perspective of a healthy sharing, I will let you comment or suggest corrections to reassess this article, inviting all the readers to keep on reading below its end. And finally (today I want to ruin myself!) besides the cookware I give away a check list of the before-and-afters in the programming.
Setting up of the console before the lighting programming
Whenever you find yourself in front of a lighting console think that reading, or better, consulting the instruction manual is not a crime. Web and social networks are full of forums, tutorials, or discussion groups where you can easily ask for a question or an advice and get in no time a good answer from the other corner of the world.
All the lighting consoles have some common sections, which eventually are similar, and often intuitively accessible, as for example Patch, Palette (or preset), Cue List (or memory list, or memory stack) and so on.
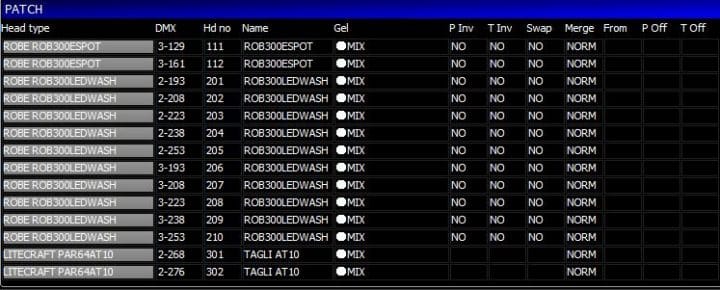
For the beginners, the Patch is a sort of table where you find the numbered list of fixtures and the related DMX address, in addition to other information that it would be unuseful to explain here; its function is to help building the data package to be sent to the lighting rig. At this step, you must take into consideration the work of the technicians who will physically install the various devices — and for this reason it is necessary — looking at the lighting plot, identify the Universe zones, as for example Univers A – Truss 1 and 2, Univers B – Truss 3 and 4, Universe C – Floor, and so on. This preliminary operation will turn out useful to obtain an orderly setup and without waste of signal cable.
Another peculiarity of the Patch is the correct numbering of the lighting fixtures. Usually in the simple setups I use to number the conventional lights from 1 to n, and then I group the other fixtures by product family or models, as for example Spot from 101 on, Wash from 201 on, Beam from 301 on, and so forth. In the more complex cases, you can think by trusses or whatever else you prefer, the important thing is that in short times you are able to recall the specific fixture, no matter the group it belongs to.
For example, knowing that the first truss carries 8 spots and 8 washes, and also that all the other fixtures on that truss have an ID starting from 101, we can chose to assign the spots from 101 to 109 and the washes from 111 to 119; in this way, if I want to select the third spot and the fifth wash, I will call the numbers 103 and 115.
This is one of the many possible approaches, which means that there are so many possibilities at your disposal; in fact, it’s up to the operator to decide which one is the most suitable for you to adopt and be quick about the selection of the fixtures.
Once completed the patch and decided the best management of it, we can step into the palette setting.
Palette is nothing but determining positions, colours, and effects (shutter, zoom, gobos and so on) which can be recalled during the programming to create memories to be added to the cue lists. For example, if in a 200 memory cue list you have chosen for 40 times in 40 different memories to use the position palette in order to set the spots parallel to focus to the FOH and you need to modify all the 40 positions, it will be sufficient to modify the single palette to find the new position in all the 40 memories, without scrolling them one by one.
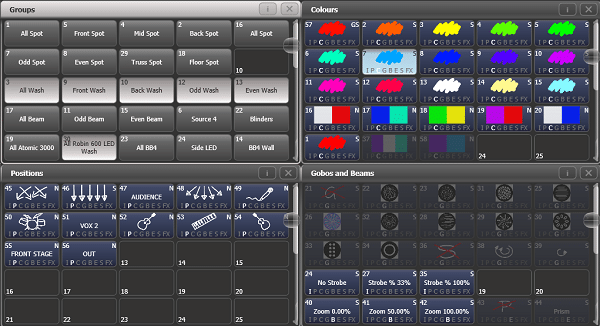
Regarding the effects (gobos, shutter, iris, prism, zoom and so on), usually I create a maximum of 4 or 5 palettes for the gobos, 3 for the shutters (no shutter, random slow e random fast), 3 for the zoom (narrow, mid e wide) 2 or more for the prism (e.g., no prism, circular e linear), the various rotation of gobos and prism (no rot, slow and fast).
You understand that this procedure facilitates a lot the real phase of programming.
About positions, you must identify carefully — often anticipating the LD, in case he’s not you — the palettes that can be useful as specials and the lights on proscenium, center stage, center proscenium, dj boot or band position, setting of all the fixtures parallel, crossed, and radial. You must always have something on the audience, memorise every new palette that pops up during the programming so to get everything standardised at best, and do not exaggerate with the number of positions, because usually with less than 5 simple palettes you can score a beautiful show.
And finally colours. If in the lighting rig there are fixtures with a color wheel, you have three possibilities to manage them:
bring the dimmer down to zero, change color and bring the dimmer up again.
organise the palette respecting as much as possible the order in the slots of each fixture, and then switch to the closest color so as to minimise the flickering effect when you change from a color to another.
set directly on the fixture the function that allows to automatically black out and switch on again every time the color is being changed. Most fixtures have this feature built in, but it’s really underestimated. As I said before, you just must consult the instruction manual.

Up to now, all the settings are standard, regardless of the typology of event you must deal with. Setting the cue is quite different, for it depends on if you are working in theatre mode or busking mode.
Theatre mode
Before going on with the creation of the various memories, it’s necessary to decide which lighting programming mode you want to run, choosing principally between the two standard options: Tracking and Cue Only (No Tracking). I will try to make it simple.
The Tracking allows principally to store in the memories only the features you have used. This means that if in the first memory you have set a dimmer at 60%, and in the second one you have set the prism and a gobo, at the end you will find the fixture switched on with gobo and prism but with the 60% dimmer you have inherited from the first cue and not memorised in the second.
So, if the Lighting Designer calls “next memory is the same of the 7th one” and you only do a copy and paste, you can easily have a completely different situation from memory 7, because it includes everything from 1 to 6. For this kind of circumstances, almost every console allows first of all to calculate automatically what happens in the first memory you recall and second to make a copy (or a snapshot in same cases) of the actual situation you see on the stage and not only of the data contained in the memory.
Busking mode
In this case I personally prefer working with palettes that I have previously set up and insert in the various fader some of the dimmer cue lists subdivided in groups of fixtures. For example, in the first fader we have the beams on the roof, in the second the beams on the floor, in the third the washes on the roof, and so on. Watch out, I have talked about the dimmer cue-lists because usually the cue 1 of the first cue stack (which, as in the previous example, regards the beams on the roof) includes the dimmer from 0 to full on the entire group, cue 2 a pulse effect from left to right, cue 3 a random pulse effect, and so on.
Once created the various dimmers and saved to the faders of the console, always thinking in terms of groups, it is possible to set the movement effects or the ones related to the other features of the fixture, on the available faders or on the executor (usually customisable physical buttons or touch buttons). Speaking about movements, I always create for each group a pan and tilt effect on two different executors, with the possibility of varying the size or speed of the single effect. If I activate only one of the two executors, the result is a horizontal or vertical movement, while if I activate both the executors, I will get a movement on two dimensions that can vary from circular to elliptical, depending on the speed and the size. In the same way you can have fun with other features like iris, zoom, shutter and so on.
Last recommendation before you start programming, is to prepare all you need before arriving on the location preferably the first day of setup. Many brands allow you to download the PC version of their controllers, so that you have the opportunity to get on the location with at least all the standard palettes ready.
In the next article I will talk about some codes of good behaviour, and I will give more useful tips for the programming management. Stay Tuned!
Walter Lutzu
Project Coordinator